 View on GitHub
 BugfenderSDK Reference
Bugfender SDK for iOS 

Bugfender is a cloud service to collect mobile application logs. Developers can control log sending programmatically and manually for each device. Logs are available at the Bugfender dashboard. You’ll need an account.
Supported iOS versions:
- BugfenderSDK 1.12 works for iOS 11.0 and newer.
- For iOS 10 support you can use BugfenderSDK 1.10.6.
- For iOS 8 support you can use BugfenderSDK 1.8.
Installing the SDK
First of all you will need to add the framework to your project.
Using CocoaPods
- Create a Podfile if you don’t have one:
pod init - Add Bugfender to your Podfile:
pod 'BugfenderSDK', '~> 1.12' - Save the file and run:
pod install. This creates an.xcworkspacefile for your app. Use this file for all future development on your application.
Using Swift Package Manager
In Xcode go to the target’s
Generaltab and press on the icon to add a new library
In the popover choose
Add Otherand thenAdd Package Dependency...
Paste the GitHub url from the Bugfender iOS repository
https://github.com/bugfender/BugfenderSDK-iOSin the textfield and pressNext
Leave the first option checked and press
Next
Xcode will download the Bugfender files and you will be prompted with the following menu. Ensure BugfenderSDK is selected and press Finish

Import
SystemConfiguration.framework,Security.framework,CoreServices.framework,CoreGraphics.frameworkandlibc++.tbdas well.
Using Carthage
- Update to at least Carthage 0.38.0
- Add to your Cartfile:
github "bugfender/BugfenderSDK-iOS" ~>1.12 - Save the file and run
carthage update --use-xcframeworks - Import
Carthage/Build/BugfenderSDK.xcframeworkto yourLinked Frameworks and Libraries(or drag-n-drop the file to your project). - Make sure to select the option “Embed framework” (or list the framework in
input.xcfilelist). - Import
SystemConfiguration.framework,Security.framework,CoreServices.framework,CoreGraphics.frameworkandlibc++.tbdas well.
Manual
If you prefer to install the SDK manually you can use the provided xcframework in the corresponding release.
- Go to your Project > Your Target > General > Frameworks, Libraries, and Embedded Content and drag
BugfenderSDK.xcframeworkthere. - Make sure to select the option “Embed framework”
- Make sure you have
SystemConfiguration.framework,Security.framework,CoreServices.framework,CoreGraphics.frameworkandlibc++.tbdthere as well.
Using Bugfender
Once you have the framework in your project, using it is as easy as using BFLog() instead of NSLog() or bfprint() instead print().
Swift
If your application uses SwiftUI and doesn’t have an AppDelegate, you might need to create one like this:
@main
struct YourAppNameApp: App {

    @UIApplicationDelegateAdaptor(AppDelegate.self) var appDelegate

    var body: some Scene {
        WindowGroup {
            ContentView()
        }
    }
}

class AppDelegate: NSObject, UIApplicationDelegate {
    func application(_ application: UIApplication, didFinishLaunchingWithOptions launchOptions: [UIApplication.LaunchOptionsKey : Any]? = nil) -> Bool {
        // your Bugfender init code here

        return true
    }
}
In your AppDelegate class:
@_exported import BugfenderSDK
And add the following to application(_:didFinishLaunchingWithOptions:):
Bugfender.activateLogger("YOUR_APP_KEY")
Bugfender.enableNSLogLogging() // optional, capture logs printed to console automatically
Bugfender.enableUIEventLogging() // optional, log user interactions automatically
Bugfender.enableCrashReporting() // optional, log crashes automatically
bfprint("Hello world!") // use bfprint() as you would use print()
Then you may use BFLog as you would normally use NSLog or print.
You may also want to specify a logging level by using the following helper functions:
Bugfender.print(...): Default log.Bugfender.warning(...): Warning log.Bugfender.error(...): Error log.
Objective-C
Make Bugfender available project-wide by adding the following line to the .pch file:
#import <BugfenderSDK/BugfenderSDK.h>
Get an API key from the Bugfender console. In your AppDelegate call activateLogger when the application starts, like this:
- (BOOL)application:(UIApplication *)application didFinishLaunchingWithOptions:(NSDictionary *)launchOptions
{
    ...
    // Activate the remote logger with an App Key.
    [Bugfender activateLogger:@"YOUR_APP_KEY"];
    [Bugfender enableNSLogLogging]; // optional, capture logs printed to console automatically
    [Bugfender enableUIEventLogging]; // optional, log user interactions automatically
    [Bugfender enableCrashReporting]; // optional, log crashes automatically
    BFLog("Hello world!") // use BFLog as you would use NSLog
    ...
}
Then you may use BFLog as you would normally use NSLog.
You may also want to specify a logging level by using the following macros:
BFLog(...): Default log.BFLogWarn(...): Warning log.BFLogErr(...): Error log.
Advanced features
Sending issues
Bugfender allows you to send issues to the server. An issue is similar to a session but they are showed in the issues section and you can send issues any time from the app, even if the device is not enabled in the system. Issues are useful to keep track of important errors that you can detect in your code.
For sending an issue you can use the following function:
Bugfender.sendIssueReturningUrl(withTitle: "Issue title", text: "Description of the issue")
Nothice that text supports Markdown notation on the server. You can add some style to the text.
Bugfender.sendIssueReturningUrl(withTitle: "App Error", text: "We have found an **Error**, we need to check it")
Send issue returns an URL pointing to the issue in the Dashboard of Bugfender. You can use that URL to create automations.
Having your app decide when to send logs
In some special circumstances you may want to send logs, regardless of the enabled state of the device in the Bugfender console, for example in a custom exception handler. Use forceSendOnce to force sending the logs once, and use setForceEnabled: to force it for some period of time.
Device associated data
You can associate information to a device as if it were a dictionary:
Bugfender.setDeviceString("value", forKey: "key")
You can find more information in our blog post Associated device information.
Log buffer size
Bugfender keeps up to 5 MB worth of log data in the device. This way Bugfender can work offline, and you can get some log data from the past when enabling a device. You can change that limit with setMaximumLocalStorageSize.
// Setting maximum cache size to 1 Mb
Bugfender.setMaximumLocalStorageSize(1024*1024)
Get Device Link
Sometimes you want to integrate Bugfender with a third party tool. For this purpose, the SDK provides a method that returns the URL for the current device. You can send it to the third party tool and easily navigate back to the logs of the device from the other tool.
Bugfender.deviceIdentifierUrl();
Get Session Link
Sometimes you want to integrate Bugfender with a third party tool. For this purpose, the SDK provides a method that returns the URL for the session. You can send it to the third party tool to easily go to the logs of the current session from the other tool.
Bugfender.sessionIdentifierUrl();
Collecting User feedback
Getting feedback from the final users is one of the most important things for an app developer. Good user feedback allows you detect errors in your app and helps you to understand better your product.
Starting from version 1.6, Bugfender provides a new feature to easily collect app feedback from final users. It takes only two minutes and a few lines of code to integrate. You can think about the User Feedback as a special kind of Issue, every time your users submit their feedback you will get a new issue in Bugfender.
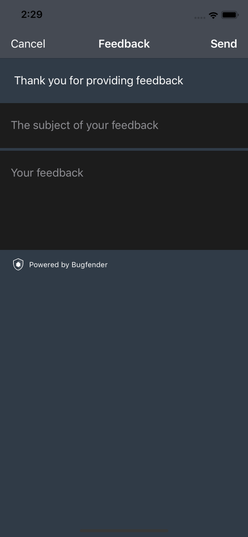
The easiest way to implement Bugfender User Feedback is using the customizable User Feedback View Controller. It provides a convenient view controller with two text fields, one short for the subject and another bigger for the feedback. Both text fields grow autommatically.
Using the default UI
Using the convenient UI provided by Bugfender requires only creating a new View Controller and presenting it modally. All you need is to call the following method and complete the required parameters with the title and placeholders for your UI.
// Instantiate new User Feedback

let nvc = Bugfender.userFeedbackViewController(withTitle: "Navigation bar title",
                                               hint: "Give some instructions to your users",
                                               subjectPlaceholder: "Placeholder for subject textfield",
                                               messagePlaceholder: "Placeholder for message textfield",
                                               sendButtonTitle: "Send",
                                               cancelButtonTitle: "Cancel") { (feedbackSent, url) in
    if (feedbackSent) {
        // Say thanks!
        // url is a direct link to the dashboard
        // Use it to create automations or send it to your server
    } else {
        // User decided to not send feedback
    }
}

// Present modally
self.present(nvc, animated: true, completion: nil)
Additionally, if you require more customization you can configure the view controller prior to presenting it.
Please note BFUserFeedbackNavigationController is a subclass of navigation controller. You need to access the view controller using the public property feedbackViewController.
// Access the root view controller.
let feedbackViewController: BFUserFeedbackViewController = nvc.feedbackViewController

// Change the background colors
feedbackViewController.mainBackgroundColor = UIColor.lightGray
feedbackViewController.secondaryBackgroundColor = UIColor.white

// Change the font of the hint text
feedbackViewController.hintFont = UIFont(name: "Avenir", size: 14)!
For a complete list of customizable attributes you can inspect “BFUserFeedbackViewController.h” or read the docs.
Using SwiftUI
Here is an example using the BFUserFeedbackNavigationController in SwiftUI:
struct SwiftUIView: View {
    @State private var showFeedbackScreen = false

    var body: some View {
        VStack {
            Text("Hello World!")
            Button("Show Feedback screen") {
                showFeedbackScreen = true
            }
        }.sheet(isPresented: $showFeedbackScreen) {
            FeedbackView() { sent, feedbackUrl in
                if sent == true,
                    let url = feedbackUrl{
                    BFLog("Sent feedback to URL: \(url.absoluteString)")
                } else {
                    BFLog("User rejected to send feedback")
                }
            }
        }.navigationBarTitle(Text("Swift UI Test"))
    }
}

struct SwiftUIView_Previews: PreviewProvider {
    static var previews: some View {
        SwiftUIView()
    }
}

struct FeedbackView: UIViewControllerRepresentable {
    typealias UIViewControllerType = BFUserFeedbackNavigationController

    let completion: (_ feedbackSent: Bool, _ feedbackUrl: URL?) -> Void

    func makeUIViewController(context: Context) -> BFUserFeedbackNavigationController {
        BFUserFeedbackNavigationController.userFeedbackViewController(
            withTitle: "This title",
            hint: "This hint",
            subjectPlaceholder: "This subject",
            messagePlaceholder: "This message",
            sendButtonTitle: "Send",
            cancelButtonTitle: "Cancel") { sent, feedbackUrl in
                completion(sent, feedbackUrl)
            }
    }

    func updateUIViewController(_ uiViewController: BFUserFeedbackNavigationController, context: Context) {}
}
Using a custom UI
If you need further customization than provided by BFUserFeedbackViewController you can implement your own UI. All you have to do is collect your user feedback as you wish and send it to Bugfender using sendUserFeedback:
let feedbackUrl = Bugfender.sendUserFeedbackReturningUrl(withSubject: "Title of the feedback", message: "message of the feedback")
The returned URL is a direct link to the Bugfender’s dashboard. Use it to create automations or to keep a reference in your servers.
Updating from BugfenderSDK prior to 1.8 and ObjC only projects
BugfenderSDK is now a dynamic framework and you will need to check the “embed framework” option when adding it to your project manually or using Carthage.
Additionally, the Bugfender.swift helper class is not needed anymore and can be safely deleted, however, Swift must be available in your project. If you are installing Bugfender manually or using Carthage ensure that Build Settings -> Always Embed Swift Standard Libraries is set to YES.
Symbolicating crash reports
Bugfender provides a script is able to upload dSYM bundles to Bugfender.
Obtain the script
The script is distributed if you are using Cocoapods or Swift Package Manager.
If you are using any other installation method you can download the script and copy it into a location inside your project.
Set up Xcode to automatically upload dSYM bundles
Use the following instructions to configure your project.